e
Design School Directory
Boards
Need some advice on which design program to choose? Seeking feedback on your portfolio or a project? The conversation starts here. Explore the Students and Schools section of our Discussion Boards for answers to your questions and help when you need it.
design.edu
+ Follow this feed-
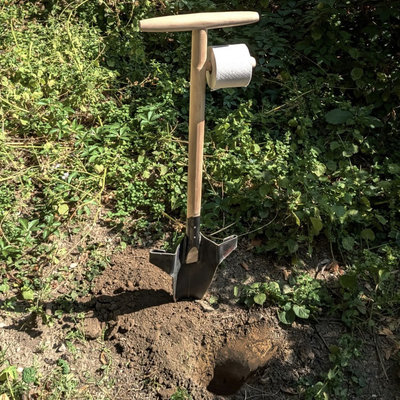
Fantastic Industrial Design Student Work: A Shovel That Helps Hikers Leave No Trace
Hideaway, by Wilhelm Berbig of the University of Applied Arts Vienna
August 11
5 Comments -
A Suggested Industrial Design Student Assignment: Design and Build a Minimalist Chess Set
I think a good Industrial Design student assignment, particularly for sophomores, would be: Design...
June 19
2 Comments -
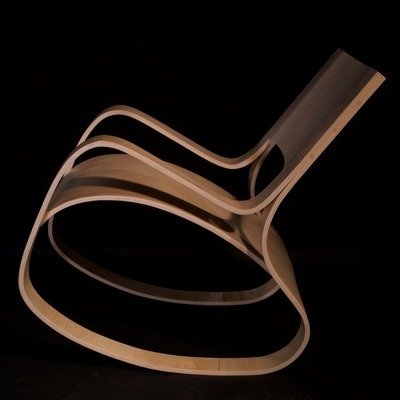
Industrial Design Student Work: A Rocking Chair Made from One Sheet of Plywood
The Curvesse, by Dashiell Schaeffer of Pratt Institute
June 11
-
Algorithmic Artificial Reef: from Industrial Design School Project to Legacy at Sea
Leo Hummel put his "SeaWeaver" to the test in the waters of Thailand before passing
May 22
-

Excellent Industrial Design Student Work: Sapna Tayal's Quilted Furniture
Expanding the possibilities of existing fabrication methods
April 25
1 Comment -

Practical Industrial Design Student Work: Designing Connectors
We've seen so many blue-sky ID school assignments that this one, which focuses on...
April 21
2 Comments 6 Favorites -

Industrial Design Student Work: A Measuring System for Festool
Some constructive criticism for a construction tool
March 25
4 Comments -

Industrial Design Student Work: A Walker for Seniors and Pets
This Toos concept is by Industrial Design students Jeoung Rae Kim, Shua Bong and...
March 12
3 Comments -

Five Steps to Create the Perfect Entry for Any Design Awards Program
It's that time of year so we've put together a quick how-to
March 5
-

Industrial Design Student Work: Turning Discarded Carpet Into Comfortable Furniture
Stool Story, by Weil of ECAL
February 27
-

Industrial Design Student Work: Technical Clothing Made from Natural Materials
Avants, by Juliette Masson of ECAL
February 13
-

Industrial Design Student Work: A Chair Designed for Painters
The Leo, by Teo Primo Frizzarin of ECAL
February 5
-

Apply to SVA's MFA in Products of Design by Jan. 15!
Learn "every flavor of design" in this multi-disciplinary MFA
December 25, 2024
-

Industrial Design Student Work: Community Gravestones for Potter's Fields
By Cameron Brentlinger of Pratt Institute
November 19, 2024
-

Industrial Design Student Work: Therapeutic Eyewear
Sooze, by Maoxin Yuan of UNSW Sydney
November 18, 2024
-

Pininfarina Sponsoring Transportation Design Master's Thesis at IAAD
Producing world-class transportation designers, Pasadena, California has ArtCenter. Turin, Italy has the Istituto d'Arte...
November 1, 2024
-

Industrial Design Student Work: An Inflatable Toilet for Environmental Protection
Our drug-infested poop is no longer fit to be buried
October 30, 2024
2 Comments -

Fantastic Industrial Design Student Work: A 3-in-1 Walking Aid
Pedestrian, by Jonas Krämer and Ayla Warncke
October 24, 2024
1 Comment 5 Favorites -

Thorough Industrial Design Student Work: An E-Bike Charging Station for Garages
The Ultium Lift, by Matthew Quejada
October 23, 2024
5 Comments -

Great Industrial Design Student Work: A Mobile Laundry Bus
Georgia Tech ID students team up with Flowing with Blessings
October 3, 2024
5 Favorites -

Industrial Design Student Work: A High-Capacity Autonomous Cargo Hauling System
Four Cargo, by Fabien Otto
September 10, 2024
3 Comments -
Industrial Design Student Work: Sneakers Designed for Disassembly
Disassembly Lab, by Robin Luginbühl at ECAL
August 8, 2024
3 Comments 5 Favorites -

Industrial Design Helping Save Lives: This Surgery Simulator by Acorn Product Development
Surgeons can practice skills in an immersive virtual environment
July 19, 2024
2 Comments -

Industrial Design Student Work: A Less Wasteful Lint Roller
By ID+IM Design Lab at KAIST
July 17, 2024
1 Comment -

Industrial Design Student Work: An Alternative to Traditional Drug Delivery Systems
MedGum, by Chiara Torterolo
July 8, 2024
-

Fantastic Industrial Design Student Work: Turning Undesirable Lumber Into Furniture
Kouéno, by Lucas Hosteing
June 11, 2024
1 Comment 9 Favorites -

Mechanical Engineering Students Invent Leaf Blower Silencer
Stanley Black & Decker will put it in production
May 16, 2024
6 Comments -

Engineering School Equivalent of ID School Egg Drop Challenge: Bridge Out of a Box
The egg is the professor
May 9, 2024
-

The Desired Future of the Next Generation: Redefining Mobility
The annual Design Schools Workshop takes place at Javits Center during ICFF from May 19-21
May 7, 2024
1 Comment -

Fantastic Industrial Design Student Work: "How Long Should Objects Last?"
Conditional Longevity, by Charlie Humble-Thomas at the RCA
May 6, 2024
3 Comments 9 Favorites -

Made in Yame: Design Excursion to Japan
Learn and apply traditional Japanese craft techniques to contemporary product design, and have the opportunity to have your product manufactured
March 27, 2024
1 Comment -

Challenging Industrial Design Student Work: An All-Gender Urinal
Urin*alle
March 27, 2024
6 Comments -

Great Industrial Design Student Work: DIY Filming Tools
Physical Tools for Digital People, by Supreetha Krishnan
March 21, 2024


K
{Welcome
Create a Core77 Account
Already have an account? Sign In
By creating a Core77 account you confirm that you accept the Terms of Use
K
Reset Password
Please enter your email and we will send an email to reset your password.